KendoUI Bridge Documentation
  • Introduction
  • About this application
    • Introduction
    • Navigation guide
    • Components catalog
    • Installation
    • Catalog index
    • Themes selector
  • About Aurelia
    • Key features
  • About KendoUI
    • Integrated with Aurelia
    • Why choose KendoUI
  • Developers tutorials
    • Introduction
    • Sample application structure
    • esnext - kendo
    • esnext-aspnetcore - kendo-2017
    • esnext-aspnetcore - kendo-2015
    • typescript - kendo
    • typescript-aspnetcore - kendo
    • esnext- webpack
    • typescript-webpack kendo
  • Developers notes
    • Current limitations
    • Loading a subset of controls
    • Lazy loading wrappers
    • Running gists
    • Kendo Tooltip HTML content
    • Bundling details
    • Dynamic content creation
    • Bundling step by step instructions
    • What you need to know
    • Localization
    • Prevent JSPM from loading jQuery
  • Bridge developers notes
    • Introduction
    • Bridge utilities
    • Generation of bindables
    • Babel DTS generator
    • Grid HTML api
    • Template compilation
    • Harvesting bindable variables
    • Registry helper class
    • Creating gists for the catalog app
  • Troubleshooting
    • Introduction
    • Using gists and GistRun
Powered by GitBook
On this page
  • 5.8 Bundling step by step instructions
  • Important note
  1. Developers notes

Bundling step by step instructions

PreviousDynamic content creationNextWhat you need to know

Last updated 7 years ago

Application Developer notes

5.8 Bundling step by step instructions

This set of instructions will guide you through setting up bundling in an Aurelia application where Kendo is used. Since there are multiple skeleton-navigation flavors out there, this tutorial will use the flavor, as that is a bit more involved example having to deal with type definition files in the bundling context. So if you want to follow this tutorial, download skeleton-typescript and follow to install Kendo and the aurelia-kendoui-bridge into the application.

The completed version of this tutorial can be found and the application's file covers bundling issues in even more details, so make sure to check that document.

  1. Open build/bundles.js

  2. Add the following bundle configuration (to get a Kendo bundle):

    "dist/kendo-build": {
       "includes": ["kendo-ui/js/*.min.js"],
       "excludes": [
         "[kendo-ui/js/angular.min.js]",
         "[kendo-ui/js/jquery.min.js]",
         "[kendo-ui/js/kendo.angular.min.js]",
         "[kendo-ui/js/kendo.angular2.min.js]",
         "[kendo-ui/js/kendo.spreadsheet.min.js]",
         "[kendo-ui/js/kendo.all.min.js]",
         "[kendo-ui/js/kendo.web.min.js]",
         "[kendo-ui/js/kendo.dataviz.min.js]",
         "[kendo-ui/js/kendo.dataviz.mobile.min.js]",
         "[kendo-ui/js/kendo.mobile.min.js]"
       ],
       "options": {
         "inject": true,
         "minify": true,
         "rev": true
       }
     }
  3. Modify the "dist/app-build" bundle configuration to include the files of the aurelia-kendoui-bridge:

     "dist/app-build": {
       "includes": [
         "[**/*.js]",
         "**/*.html!text",
         "**/*.css!text"
       ],
       "options": {
         "inject": true,
         "minify": true,
         "depCache": true,
         "rev": false
       }
     }

    The bundles.js file should now look like .

  4. Run gulp bundle. This may take several minutes to complete

  5. In order to run the app without gulp modifying the dist folder, we can use http-server. Run the following command to install it: npm install http-server -g

  6. Now run http-server:

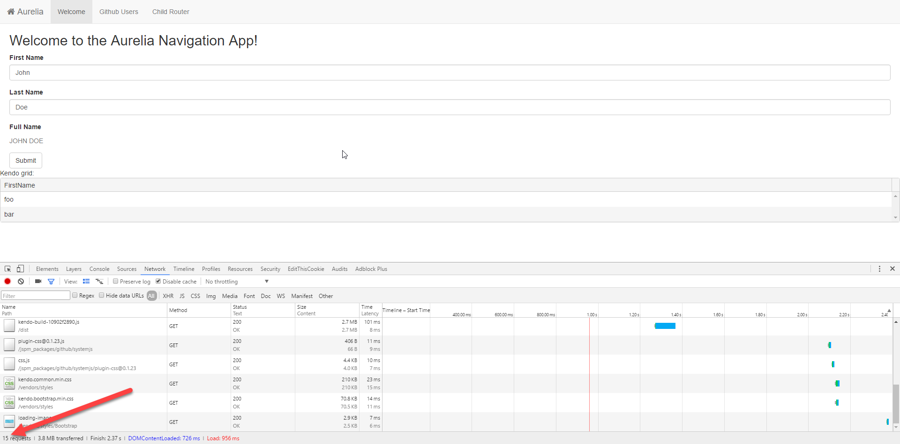
  7. Open in your browser and notice that significantly less files are loaded:

Important note

You can find this complete application as a to this book. .

companion document
skeleton-typescript
these instructions
here
README
this
http://localhost:8080
img
img
img