esnext-aspnetcore - kendo-2017

Summary

This article replaces the original esnext-aspnetcore - kendo-2015 by describing the changes due to .NET Core 2.0 SDK. Note that the reference to installing .NET core SDK (as mentioned in the paragraph below has to be changed to point to this article.

  • Details on building and running this applications are here.

  • Temporarily (until this whole books is completely updated, please use the this next section as a guide for KendoUI SDK and KendoUI bridge installation. Observe that several references to KendoUI SDK are different than in the original esnext-aspnetcore - kendo-2015 chapter.

Details

Step 0 - KendoUI SDK and KendoUI bridge installation

Progress / Telerik has dramatically improved the tooling for KendoUI SDK distribution and installation by adding the support for using npm in that process (see this article for more details). Because of that, we will now always use the command

npm install --save @progress/kendo-ui

as the means to add KendoUI PRO SDK to various applications described in this set of tutorials

Step 1.

Since we are starting with the well known skeleton-esnext-aspnetcore, let's start with making the folder skeleton-esnext-aspnetcore-2017\src\skeleton to be the current folder and entering the following commands in the console:

    npm install --save @progress/kendo-ui
    npm install css aurelia-kendoui-bridge
    jspm install

(Note that jspm install simply updates the existing config.jsfile, to accomodate for just added KendoUI SDK, as well as css and aurelia-kendoui-bridge bridge libraries. )

Step 2.

Manually pdate config.js (Note that this file is now in wwwroot/config.js file)

    paths: {
       "*": "dist/*",
       "github:*": "jspm_packages/github/*",
       "npm:*": "jspm_packages/npm/*",
       "kendo.*": "node_modules/@progress\kendo-ui/js/kendo.*.js"
    },

Step 3.

Add this autocomplete.js file to the project

    import 'kendo-ui/js/kendo.autocomplete.min';

    export class autocomplete{
      constructor() {
        this.datasource = {
          transport: {
            read: {
              dataType: 'jsonp',
              url: '//demos.telerik.com/kendo-ui/service/Customers'
            }
          }
        };
      }    
    }

Step 4.

Add this autocomplete.html file project

    <template>
      <require from="aurelia-kendoui-bridge/autocomplete/autocomplete"></require>
      <require from="aurelia-kendoui-bridge/common/template"></require>
      <require from="kendo-ui/styles/kendo.common.min.css!"></require>
      <require from="kendo-ui/styles/kendo.bootstrap.min.css!"></require>
      <require from="./autocomplete.css"></require>

      <div id="example" style="margin-top: 20px; margin-left: 20px">
        <div class="demo-section k-content">
          <p><strong>Customers:</strong></p>

          <ak-autocomplete k-data-source.bind="datasource"
                          k-height.bind="400"
                          k-min-length.bind="1"
                          k-data-text-field="ContactName">
            <ak-template>
              <span class="k-state-default" style="background-image: url('http://demos.telerik.com/kendo-ui/content/web/Customers/${CustomerID}.jpg')"></span>
              <span class="k-state-default"><h3>${ContactName}</h3><p>${CompanyName}</p></span>
            </ak-template>
            <ak-template for='headerTemplate'>
              <div class="dropdown-header k-widget k-header">
                <span>Photo</span>
                <span>Contact info</span>
              </div>
            </ak-template>

            <input id="autocomplete-customizing-templates-customers" style="width: 50%"/>
          </ak-autocomplete>

          <p class="demo-hint">Start typing to find a customer. E.g. "Ann" </p>
        </div>
      </div>
    </template>

Step 5.

Add this autocomplete.css file to the project

    .dropdown-header {
            border-width: 0 0 1px 0;
            text-transform: uppercase;
        }

        .dropdown-header > span {
            display: inline-block;
            padding: 10px;
        }

        .dropdown-header > span:first-child {
            width: 50px;
        }

        .k-item {
            line-height: 1em;
            min-width: 300px;
        }

        /* Material Theme padding adjustment*/

        .k-material .k-item,
        .k-material .k-item.k-state-hover,
        .k-materialblack .k-item,
        .k-materialblack .k-item.k-state-hover {
            padding-left: 5px;
            border-left: 0;
        }

        .k-item > span {
            -webkit-box-sizing: border-box;
            -moz-box-sizing: border-box;
            box-sizing: border-box;
            display: inline-block;
            vertical-align: top;
            margin: 20px 10px 10px 5px;
        }

        .k-item > span:first-child {
            -moz-box-shadow: inset 0 0 30px rgba(0,0,0,.3);
            -webkit-box-shadow: inset 0 0 30px rgba(0,0,0,.3);
            box-shadow: inset 0 0 30px rgba(0,0,0,.3);
            margin: 10px;
            width: 50px;
            height: 50px;
            border-radius: 50%;
            background-size: 100%;
            background-repeat: no-repeat;
        }

        h3 {
            font-size: 1.2em;
            font-weight: normal;
            margin: 0 0 1px 0;
            padding: 0;
        }

        p {
            margin: 0;
            padding: 0;
            font-size: .8em;
        }

Step 6.

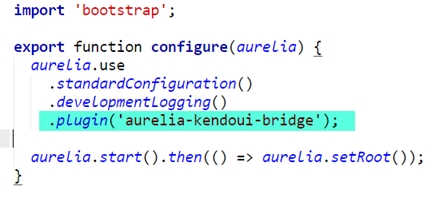
Add the request to load the aurelia-kendoui-bridge plugin by adding the highlighted statement below (.plugin('aurelia-kendoui-bridge'); to the file main.js
Step 7.

Add the following line to app.js

    { route: 'autocomplete',  name: 'autocomplete', moduleId: 'autocomplete', nav: true, title: 'Autocomplete' }

Last updated