esnext-aspnetcore - kendo-2015
Application Developer tutorials
esnext-aspnetcore - kendo
Summary
Details on building and running this applications are here.
Kendo Core and KendoUI bridge installation is defined in this section of the Installation document.
Details
Step 1.
Run the following command in the console:
jspm install css kendo-ui aurelia-kendoui-bridge
(Note that at this point, the npm install && jspm install
command was already executed to get the original app built - see the related README for details.)
Step 2.
Update config.js
(Note that this file is now in wwwroot/config.js
file)
paths: {
"*": "dist/*",
"github:*": "jspm_packages/github/*",
"npm:*": "jspm_packages/npm/*",
"kendo.*": "jspm_packages/github/kendo-labs/bower-kendo-ui@2016.3.1306/js/kendo.*.js" <----
},
Step 3.
Add this autocomplete.js
file to the project
import 'kendo-ui/js/kendo.autocomplete.min';
export class autocomplete{
constructor() {
this.datasource = {
transport: {
read: {
dataType: 'jsonp',
url: '//demos.telerik.com/kendo-ui/service/Customers'
}
}
};
}
}
Step 4.
Add this autocomplete.html
file project
<template>
<require from="aurelia-kendoui-bridge/autocomplete/autocomplete"></require>
<require from="aurelia-kendoui-bridge/common/template"></require>
<require from="kendo-ui/styles/kendo.common.min.css!"></require>
<require from="kendo-ui/styles/kendo.bootstrap.min.css!"></require>
<require from="./autocomplete.css"></require>
<div id="example" style="margin-top: 20px; margin-left: 20px">
<div class="demo-section k-content">
<p><strong>Customers:</strong></p>
<ak-autocomplete k-data-source.bind="datasource"
k-height.bind="400"
k-min-length.bind="1"
k-data-text-field="ContactName">
<ak-template>
<span class="k-state-default" style="background-image: url('http://demos.telerik.com/kendo-ui/content/web/Customers/${CustomerID}.jpg')"></span>
<span class="k-state-default"><h3>${ContactName}</h3><p>${CompanyName}</p></span>
</ak-template>
<ak-template for='headerTemplate'>
<div class="dropdown-header k-widget k-header">
<span>Photo</span>
<span>Contact info</span>
</div>
</ak-template>
<input id="autocomplete-customizing-templates-customers" style="width: 50%"/>
</ak-autocomplete>
<p class="demo-hint">Start typing to find a customer. E.g. "Ann" </p>
</div>
</div>
</template>
Step 5.
Add this autocomplete.css
file to the project
.dropdown-header {
border-width: 0 0 1px 0;
text-transform: uppercase;
}
.dropdown-header > span {
display: inline-block;
padding: 10px;
}
.dropdown-header > span:first-child {
width: 50px;
}
.k-item {
line-height: 1em;
min-width: 300px;
}
/* Material Theme padding adjustment*/
.k-material .k-item,
.k-material .k-item.k-state-hover,
.k-materialblack .k-item,
.k-materialblack .k-item.k-state-hover {
padding-left: 5px;
border-left: 0;
}
.k-item > span {
-webkit-box-sizing: border-box;
-moz-box-sizing: border-box;
box-sizing: border-box;
display: inline-block;
vertical-align: top;
margin: 20px 10px 10px 5px;
}
.k-item > span:first-child {
-moz-box-shadow: inset 0 0 30px rgba(0,0,0,.3);
-webkit-box-shadow: inset 0 0 30px rgba(0,0,0,.3);
box-shadow: inset 0 0 30px rgba(0,0,0,.3);
margin: 10px;
width: 50px;
height: 50px;
border-radius: 50%;
background-size: 100%;
background-repeat: no-repeat;
}
h3 {
font-size: 1.2em;
font-weight: normal;
margin: 0 0 1px 0;
padding: 0;
}
p {
margin: 0;
padding: 0;
font-size: .8em;
}
Step 6.
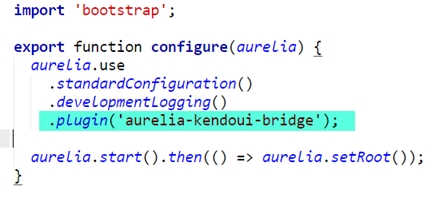
Add the request to load the aurelia-kendoui-bridge plugin by adding the highlighted statement below (.plugin('aurelia-kendoui-bridge');
to the file main.js
Step 7.
Add the following line to app.js
{ route: 'autocomplete', name: 'autocomplete', moduleId: 'autocomplete', nav: true, title: 'Autocomplete' }
Last updated